
Minimum Viable Yagi - To Market In 13 Days
October 23, 2026Some time last year I volunteered to make a tape measure Yagi-Uda antenna kit for a club picnic. Of course I procrastinated and pulled the project together at the last minute - but then I decided to pull together an entire product based on that design. The kits launched at Pacificon this year and are now live on my website.
Read on for details… or go buy the kit, or both, your call.
PAARA puts on the PAARA In The Park event twice a year. It’s a club picnic where we get together, put up a beam, light the BBQ, and invite the community to join us. We always put on some radio related activity, usually a build of some kind. We get folks of all ages and experience levels. It’s a great time for everyone and one of my favorite events all year.
If you’re in the San Francisco Bay Area keep on eye on PAARA.org for the announcement.
The Kit Design
A design I had already built caught they eye of one of the club’s board members. I had built an antenna with 3D printed element holders, no hose clamps or pipe fittings needed. The element blocks were also adjustable for easier tuning.
We decided to make a two meter Yagi build the next picnic project. I had a few ideas to refine the design further. Instead of soldering stripped coax to the elements I could punch holes in the tape and crimp ring terminals onto the wires, the whole thing would go together with just a screwdriver. One of the suppliers I use for parts for my products gave me a good price on making the coax pigtails with ring terminals.
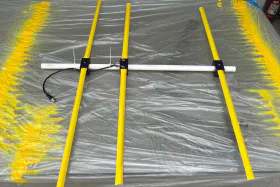
There’s not much else to it. Three 3D printed blocks, one designed for mounting the driven element halves and the other two for parasitic elements. Add a coax pigtail, a match wire, a couple zip ties, ten screws, tape measure elements, and a few feet of 1/2" PVC pipe.
Making Kits
I bought most of the parts from the local hardware store, found dirt cheap tape measures, and ordered coax adapters from AliExpress. Then a few club members got together to put everything together.
From 18 25’ tape measures we could theoretically make 48 antennas. 192 elements to cut, sand, hole-punch, and paint. We screwed up a couple elements which cost us one antenna, built two antennas verifying the design and instructions, and managed a yield of 45 antenna kits from only 18 tape measures.
Pro-tip: write out your cut sheets ahead of time, you can reduce material waste a lot.
45 sets of screws to count. 45 match wires to cut and strip. 90 ring terminals to crimp. 135 blocks to print, 90 threaded heat-set inserts to insert. 45 kits to pack and 45 pieces of pipe to cut.
That took four of us three Saturdays to get done.


The Result
Out of 45 kits 41 were built. Far more than I expected, we were initially talking about 25 or 30 kits. I’m glad we built more than we thought we needed.
We had builders as young as 8 and as old as 90, everyone went away with a functional antenna. Another club member put a couple of foxes in the field for folks to try out their new antennas, more members chipped in guiding the builders and testing the antennas.
It was a smash hit!
We had a couple of minor defects with a few of the printed driven element blocks. Specifically the heat-set threaded inserts were misaligned or clogged with plastic. I had enough spares on hand to cover the defects.
The four leftover kits will end up as raffle prizes or gifts to new hams.


Lessons Learned
Most important - always have spare parts and always do a dry run of your build. We had defects in a few of our printed blocks and a couple bad machine screws. With spare parts none of the defects became a problem. A dry run build with a club member (that hadn’t been part of the design or kit packing) revealed problems with the instructions and the design (we needed to punch more holes in the tapes).
Around the screws attaching the driven element halves I had a round hole to fit the ring terminals on the coax pigtail and match element. I did not design any passage for the wires. That wasn’t great aesthetically and required a lot of force tightening the screws. The attachment point for the driven halves was right at the edge of the element making it less secure that it could be - screws were pinching the edges of the tape rather than passing through a clean hole.
I refined the design of the 3D printed parts to use wood screws for all attachments, moved the screw holes a bit for better attachment of the driven element halves, and added a notch for wires to pass through neatly.
The refined design is easier to produce, easier to assemble, and looks just a little bit neater. No major changes, but little refinements can have a big impact.
A Product in Thirteen Days
PAARA In The Park was October 3rd. Pacificon starts October 16th so I had to immediately start assembling product and packing for the event. I still had signage to design and print, parts to turn in to products, and a presentation to finish.
At the last minute I decided to try to make this kit a product in time for the show. There was no time to order parts from overseas suppliers - I was limited to local stores and online suppliers with quick and reliable shipping.
Once again I got lucky on cheap tape measures. Screws, zip ties, ring terminals, and such were easy to source. Coax pigtails were harder but I found a local supplier with a good price on finished cables. Each cable could be cut in half, each half stripped, the braid combed out, ring terminals crimped, and the whole thing sealed up in heatshrink. It’s a ton of effort but doable.
My printer (and a friend’s printer) worked 24/7 printing out the blocks. I cut, sanded, and painted 30 25’ tape measures worth of elements - 80 antennas. Cut, stripped, and crimped match wires. Counted screws and made coax pigtails. Those pigtails took forever. I was crimping and heatshrinking in my hotel room in the evenings during the show so I could have enough kits to sell the next day.
But I did it. The Minimum Viable Yagi launched at Pacificon and I sold most of that initial batch. I even somehow put together the rest of my booth and finished my presentation (A Novel Approach to CW Decode) with time to spare.
The kits are live on my website and selling as fast as I can make them. Production is ramping up but my printer is still running 24/7 (and my local MicroCenter is giving me weird looks every time I buy a cart load of filament).
As always the source materials are on my GitHub, free for non-commercial use.

Closing Thanks
Special thanks to Darryl (KI6LDM), Bob (KN6YGN), Sorin (KN6YUH), and Doug (KG6LWE) for spending multiple Saturdays making kits for PAARA In The Park. To Connie (W6EFI) for testing out the design, creating instructions for our builders, and hiding foxes for everyone to find. To Elliot (K9EO) for printing almost two weeks straight.
All photos credit Sorin. The rest of us didn’t remember to take a single picture.
Finally thanks to all the members of PAARA for everything they do putting together fantastic events like PAARA In The Park.
73 folks, AI6YM